
Cleaning the refrigerator is one of those household chores that we often put off until it’s absolutely necessary. However, a clean and sanitized refrigerator is crucial for keeping your food fresh and safe to eat. Not to mention, it can also help your appliance run more efficiently and extend its lifespan. In this blog, we’ll walk you through the steps of a thorough refrigerator cleaning process, share some helpful tips, and explain why regular maintenance is essential.
- Why Refrigerator Cleaning Matters
- Steps 1: Preparing for the Cleaning
- Step 2: Cleaning the Interior
- Step 3: Cleaning the Freezer
- Step 4: Cleaning the Exterior
- Step 5: Sanitizing the Refrigerator
- Reassembling and Organizing
- Regular Maintenance Tips
- Conclusion
Why Refrigerator Cleaning Matters
Before diving into the how-to, let’s understand why it’s important to keep your refrigerator clean. Here are a few reasons:
- Food Safety: A clean fridge prevents the growth of bacteria and mold that can contaminate your food and cause foodborne illnesses.
- Efficiency: Dirt and grime can affect the performance of your refrigerator, making it work harder and use more energy.
- Odor Control: Regular cleaning prevents unpleasant odors that can transfer to your food.
- Longevity: Routine maintenance helps keep your refrigerator in good working condition, potentially extending its lifespan.
Now, let’s get into the step-by-step process of refrigerator cleaning and sanitizing.
Steps 1: Preparing for the Cleaning
Gather Your Supplies
To clean your refrigerator thoroughly, you’ll need the following supplies:
- Mild dish soap
- Baking soda
- White vinegar
- Warm water
- Microfiber cloths or sponges
- Toothbrush or small scrub brush
- Spray bottle
- Trash bags
- Cooler or ice packs (to keep perishable items cold)
- Vacuum with a hose attachment
Empty the Refrigerator
Start by emptying the contents of your refrigerator. This might seem like a daunting task, but it’s essential for a deep clean. Follow these steps:
- Sort and Discard: Check the expiration dates and condition of all items. Discard anything that’s expired, spoiled, or you no longer need.
- Store Perishables: Place perishable items like dairy, meat, and produce in a cooler with ice packs to keep them cold while you clean.
- Remove Shelves and Drawers: Take out all removable shelves, drawers, and bins. These will be easier to clean separately.

Step 2: Cleaning the Interior
Wash Shelves and Drawers
Once you’ve removed all shelves and drawers, it’s time to give them a good wash:
- Soak in Warm Soapy Water: Fill your sink or bathtub with warm water and add a few drops of mild dish soap. Soak the shelves and drawers for a few minutes to loosen any stuck-on food.
- Scrub and Rinse: Use a sponge or cloth to scrub away any dirt or grime. For stubborn spots, a toothbrush or small scrub brush can be very effective. Rinse thoroughly with warm water.
- Dry Completely: Let the shelves and drawers air dry completely, or dry them with a clean towel before putting them back in the fridge.

Clean the Interior Walls
With the shelves and drawers out of the way, you can easily clean the interior walls and surfaces of the refrigerator:
- Make a Cleaning Solution: Mix equal parts of white vinegar and warm water in a spray bottle. Vinegar is a natural disinfectant that helps to kill bacteria and neutralize odors.
- Spray and Wipe: Spray the solution generously on the interior surfaces, including the walls, ceiling, and floor of the fridge. Let it sit for a few minutes to break down any grime. Wipe down with a microfiber cloth or sponge.
- Tackle Tough Spots: For any stubborn stains or spills, make a paste with baking soda and a little water. Apply the paste to the spot and scrub gently with a cloth or brush.
- Dry the Surfaces: Use a dry cloth to wipe down all surfaces and remove any remaining moisture.
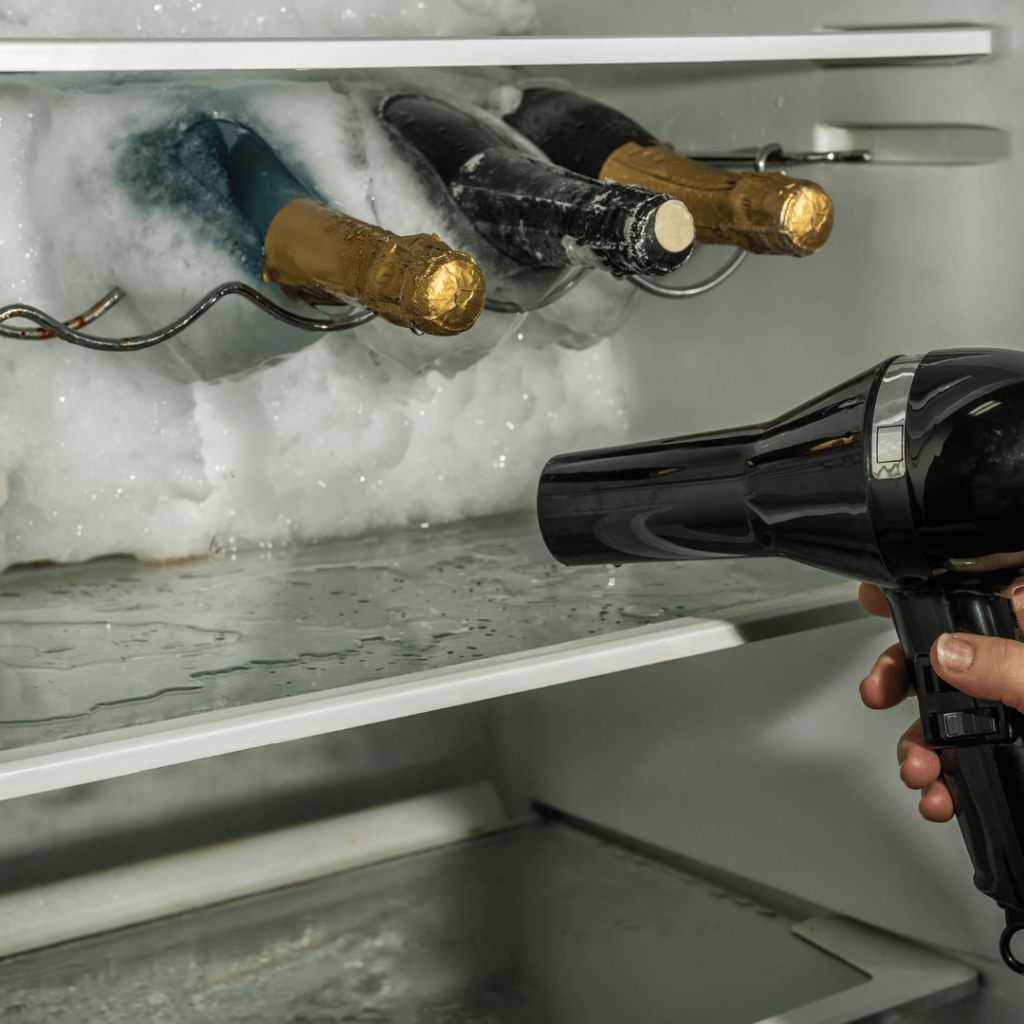
Step 3: Cleaning the Freezer
Defrost if Necessary
If your freezer has a significant amount of ice buildup, you’ll need to defrost it before cleaning:
- Turn Off the Freezer: Unplug the refrigerator or turn off the freezer compartment.
- Remove Ice: Allow the ice to melt naturally or use a hairdryer to speed up the process. Be sure to place towels around the base of the freezer to catch any water.
Clean the Freezer Interior
Follow similar steps as with the refrigerator interior:
- Spray and Wipe: Use the vinegar and water solution to spray down the interior surfaces of the freezer. Wipe clean with a cloth or sponge.
- Scrub Tough Spots: For any stubborn stains or residue, use a baking soda paste and scrub gently.
- Dry Completely: Make sure the freezer is completely dry before turning it back on to prevent ice buildup.
Step 4: Cleaning the Exterior
Wipe Down the Doors
The exterior of your refrigerator can get just as dirty as the inside. Here’s how to clean it:
- Spray and Wipe: Spray the vinegar and water solution on the doors and handles. Wipe down with a cloth, paying special attention to handles and touch points where germs can accumulate.
- Polish Stainless Steel: If you have a stainless steel refrigerator, use a stainless steel cleaner or a mixture of water and a small amount of dish soap. Wipe in the direction of the grain to avoid streaks.
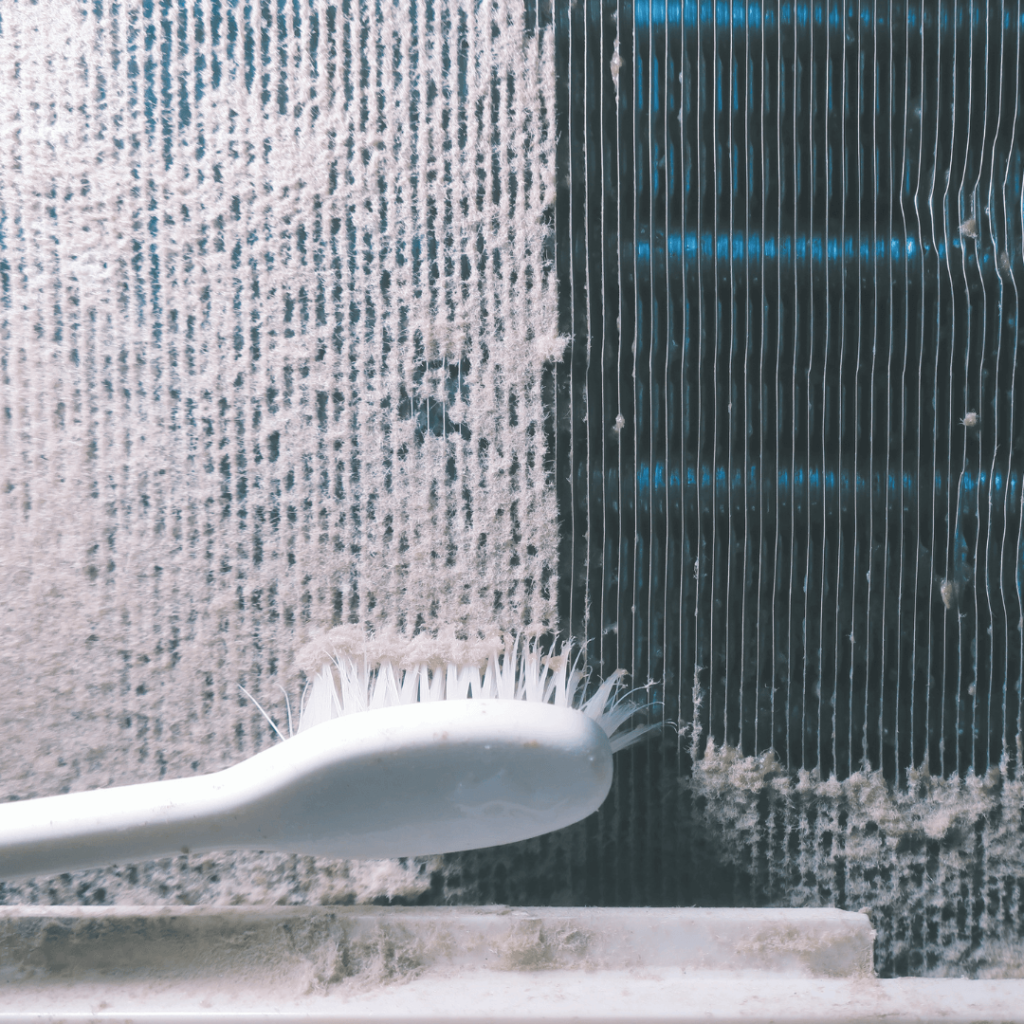
Clean the Coils
Dirty coils can cause your refrigerator to work harder, consuming more energy. Cleaning them is crucial for efficiency:
- Locate the Coils: The coils are usually located either at the back or underneath the refrigerator. Consult your owner’s manual if you’re unsure.
- Vacuum the Coils: Use a vacuum with a hose attachment to remove dust and debris from the coils. If they’re particularly dirty, use a coil cleaning brush (available at most hardware stores) to loosen the dirt before vacuuming.
Step 5: Sanitizing the Refrigerator
Once you’ve cleaned your refrigerator, it’s time to sanitize it. This step is crucial for killing any remaining bacteria and ensuring a hygienic environment for your food.
Use a Sanitizing Solution
- Mix the Solution: Combine one tablespoon of liquid bleach with one gallon of water. Pour the solution into a spray bottle.
- Spray and Let Sit: Lightly spray the interior surfaces of the refrigerator with the bleach solution. Let it sit for about 5 minutes to ensure it kills any bacteria.
- Wipe Down: Wipe the surfaces with a clean, damp cloth to remove any residue from the bleach solution.

Reassembling and Organizing
Replace Shelves and Drawers
Once everything is clean and dry, you can start putting your refrigerator back together:
- Reinstall Shelves and Drawers: Place the shelves, drawers, and bins back in their original positions.
- Reorganize Food Items: When returning food to the fridge, take the opportunity to organize it for maximum efficiency. Store similar items together, keep frequently used items within easy reach, and make sure nothing is blocking the air vents.
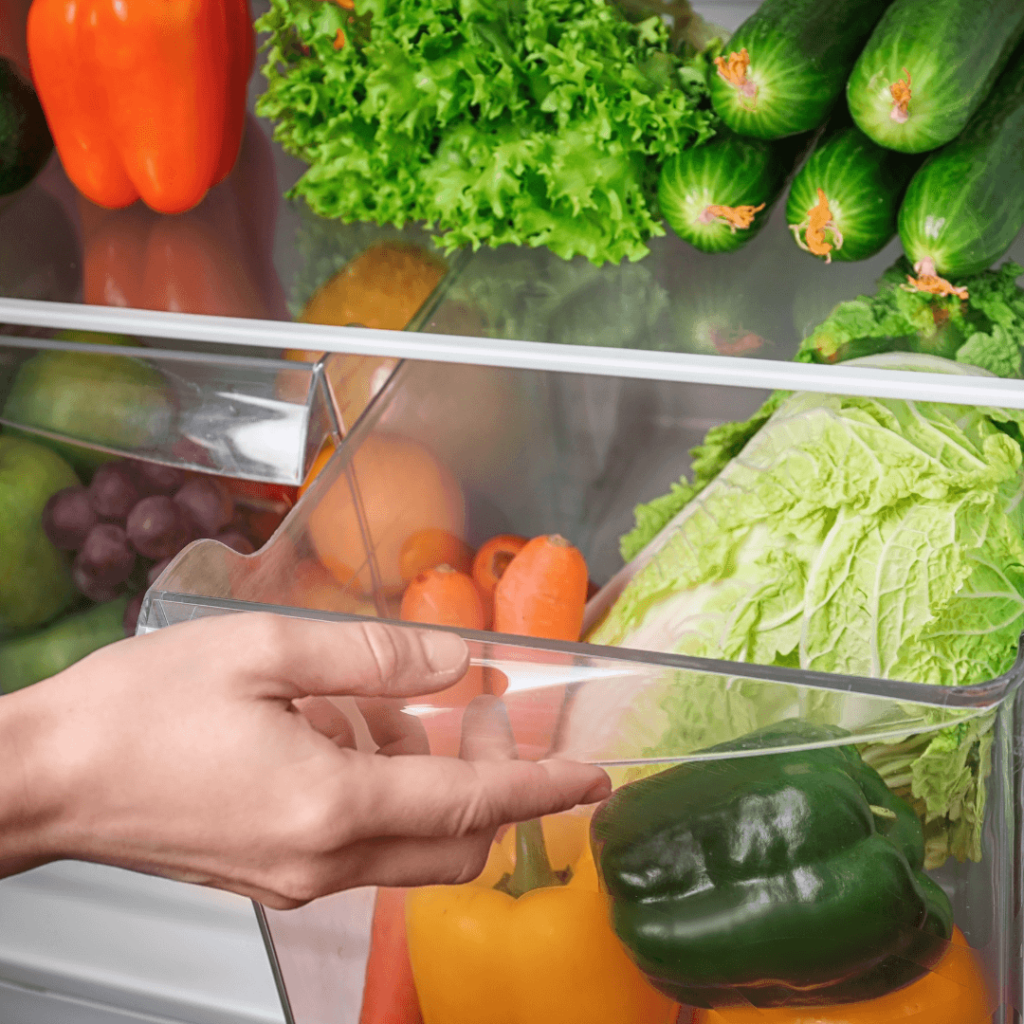
Organize for Freshness
Here are a few tips for organizing your refrigerator to keep your food fresh:
- Top Shelf: Store ready-to-eat foods like leftovers, drinks, and snacks on the top shelf.
- Middle Shelf: Use the middle shelf for dairy products like milk, cheese, and yogurt.
- Freezer: Store raw meat, poultry, and fish in the freezer in a leak-proof container to prevent cross-contamination.
- Crisper Drawers: Keep fruits and vegetables in the crisper drawers. Many refrigerators have adjustable humidity settings for these drawers; use the higher humidity setting for vegetables and the lower setting for fruits.
- Door Shelves: The refrigerator door is the warmest part, so store condiments, sauces, and other items with longer shelf lives here.
Regular Maintenance Tips
Keeping your refrigerator clean and sanitized isn’t just a one-time task. Regular maintenance will ensure it stays in top shape and continues to keep your food safe. Here are some tips for ongoing care:
- Weekly Check: Do a quick weekly check to discard expired or spoiled items and wipe down any spills immediately.
- Monthly Cleaning: Give your fridge a more thorough cleaning once a month, wiping down shelves and drawers, and checking for hidden spills.
- Deep Cleaning: Aim to do a deep clean and full sanitization every three to four months, following the steps outlined in this guide.
- Coil Cleaning: Clean the coils at least twice a year to ensure your refrigerator runs efficiently.
- Temperature Check: Regularly check the temperature settings to ensure your fridge and freezer are at the optimal temperatures (around 2 to 4°C for the fridge and -17 to -15°C for the freezer).
Conclusion
Cleaning and sanitizing your refrigerator might not be the most glamorous task, but it’s an essential one for maintaining food safety, efficiency, and appliance longevity. By following the steps outlined in this guide, you can ensure your refrigerator remains a clean, sanitary, and efficient appliance in your kitchen. Regular maintenance will make each cleaning session easier and keep your fridge running smoothly for years to come.
Remember, a little effort goes a long way in keeping your refrigerator – and by extension, your food and family – in the best possible condition. So, roll up your sleeves, gather your cleaning supplies, and give your refrigerator the care and attention it deserves.
For more maintenance and troubleshooting guides, read our blog.
You May Also Like
- How to Choose the Right Refrigerator Size for Your Home?

- Why Is My Washing Machine Not Draining Water?
- Why You Should Deep Clean Your Washer Dryer Once a Year?
- Inverter or Non-Inverter Air Conditioner: Which To Buy?
- What is the Right Air Conditioner Horsepower for Your Home?
- 5 Tips to Buy an Air Conditioner in Malaysia